From cupboards being turned into three-story guinea pig houses to entire areas of the room cornered off with a cute white picket fence, we’ve seen guinea pig housing of all kinds. Some people like to create hybrids using traditionally bought hutches and expanding on them, while others like to start from scratch, reusing whatever furniture they have lying about.
Whatever you choose to do, the main thing that matters is that the space is large enough and safe enough. If you’re unsure of how big your guinea pig cage should be, check out our guide to make sure you’re meeting the requirements. It’s also crucial that you fill the space with toys and accessories, so your guinea pig to ensure they’re getting enough enrichment.
So with all that in mind, let’s get started with how you can create your very own DIY guinea pig cage.
How to make a guinea pig cage
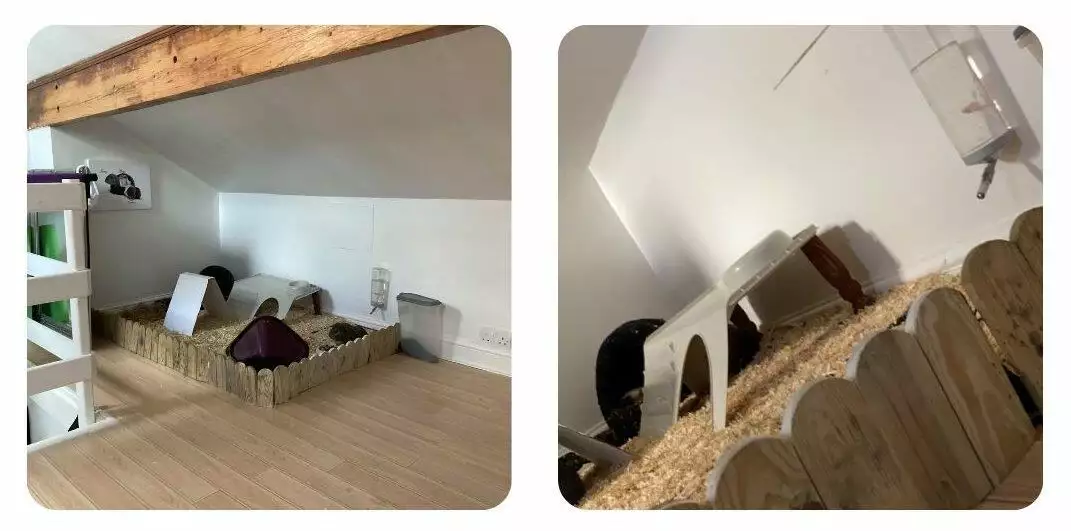
Making a wooden guinea pig cage:
Wooden cages are great because they’re natural, chew friendly and can look very pretty. They are ideal for anyone willing to give their guinea pigs an entire room as home, but who needs to close off an area for sleeping.
Image credit: Heather VeitchStep 1.
You need a ready-cut picket fence, three large plastic garden trays and a weed guard.
Step 2.
Lay the weed guard first, so the cage has something water-resistant to protect it from urine or water.
Step 3.
Place the three garden trays on the top and fit them together side by side. Once they’re in place, glue them together using gorilla (super) glue.
Step 4.
Measure out the fence panels and cut them down to size.
Step 5.
Screw the planks to the garden trays using a drill or glue them together. For extra strength, do both.
Step 6.
Finishing touches – add your lining. You can choose to put a fleece blanket down or place a thick layer of sawdust on top for a more natural look.
Step 7.
Then all that’s left is to add the enrichment accessories, including hide-outs, tunnels and toys, as well as food, drink and some cosy beds.
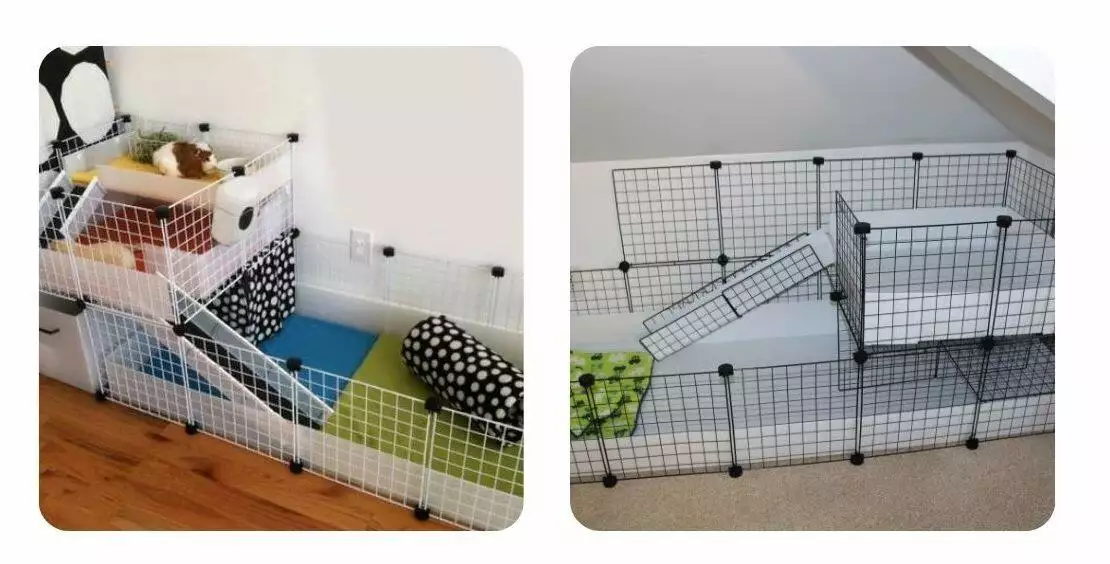
How to make a C&C cage for guinea pigs:
C&C cage stands for Cubes and Coroplast cage. The cubes are the grids used to create the structure of the cage, while coroplast is the plastic base used in the cage. You can make them as large and tall as needed, so they are a favourite for most guinea pig owners, especially if you want to make it two storeys.
Imaged Credit: crittermamas.com & alexandriasanimals.wordpress.comStep 1.
Before you start making the cage, it’s always a good idea to put something waterproof down on the floor, like a shower/pool liner, for that added protection. Also, think about how large you want the cage to be, and how many panels you, therefore, need to buy.
Step 2.
Next, you’re going to want C&C grids; you can find these on Amazon, eBay or a local pet store. You’re also going to want C&C connectors to join the panels together.
Some people use cable/zip ties to tie the grids together. This is also doable, but we would recommend using connectors for the main base and then using cable ties to add extra safety.
Step 3.
Lay the grids on the ground to mark out the size and shape that you want your cage to be.
Step 4.
Join the grids together with the connectors. Add cable ties if using – make sure the leftover part of the cable tie is on the outside of the cage so your guinea pigs won’t be tempted to chew the tag. Try to use these high up, too.
Step 5.
Once you have the base and sides of your cage, you can now think about the flooring. The flooring needs to be water-resistant and have a flat surface, so we’d recommend using traditional coroplast. You may need to cut these pieces down and duct tape them together.
If you do use tape, make sure it’s on the bottom of the coroplast rather than the surface that the guinea pigs are going to be on.
Step 6.
Now that you have your basic structure, you can now think about adding levels. This will work in the same way as the base in that you simply choose a level that you want and ensure each corner is tied to the main sides of the guinea pig cage.
Step 7.
You can now begin to lay padding down inside the cage. We recommend placing puppy training pads on the coroplast where your pigs will be using the toilet.
Step 8.
Add some straw/hay for bedding along with fleece bedding, accessories, huts and then you’re done. All that’s left is for your piggy to check out their new abode.
Final Note
It’s also nice to add extras to the room to make the place feel a little bit more like home. Many use fairy lights and photos, as a human would have! However, it’s important to make sure these aren’t in a place where your piggies can chew them.
We hope we’ve provided plenty of tips and inspiration and now all that’s left is to start making your wonderful little cavy cove!